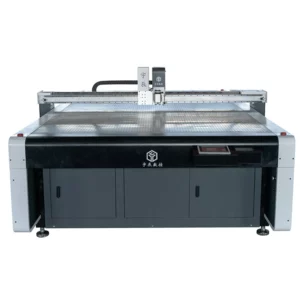
The initial setup and calibration of a leather cutting machine are crucial steps to ensure its optimal performance and longevity.
Here are the typical requirements and steps involved:
Initial Setup
- Unpacking and Inspection:
- Carefully unpack the machine and inspect all components for any damage during shipping.
- Ensure all parts and accessories are present as per the manufacturer’s checklist.
- Placement:
- Position the machine on a stable, level surface to avoid vibrations during operation.
- Ensure the workspace has adequate ventilation and lighting.
- Power Supply:
- Connect the machine to a suitable power source as per the manufacturer’s specifications.
- Use a surge protector to safeguard against electrical surges.
- Software Installation:
- Install the necessary software on the computer that will be used to control the machine.
- Ensure the computer meets the minimum system requirements for the software.
- Connectivity:
- Connect the machine to the computer using the recommended interface (USB, Ethernet, etc.).
- Install any necessary drivers or firmware updates.
- Initial Machine Setup:
- Follow the manufacturer’s instructions to complete the initial setup of the machine.
- This may include attaching the cutting head, installing blades, and securing any other components.
Calibration
- Blade Installation and Adjustment:
- Install the cutting blade according to the manufacturer’s guidelines.
- Adjust the blade height and angle to ensure it is correctly positioned for the thickness of the leather being used.
- Cutting Bed Alignment:
- Ensure the cutting bed is level and properly aligned.
- Check for any obstructions or debris on the cutting surface.
- Test Cuts and Adjustments:
- Perform a series of test cuts on scrap leather to fine-tune the machine settings.
- Adjust the cutting pressure and speed based on the results of the test cuts to achieve clean and precise edges.
- Software Calibration:
- Calibrate the software settings to match the physical dimensions and capabilities of the machine.
- Input the correct parameters for cutting speed, pressure, and other relevant settings.
- Sensor and Detection Systems:
- Calibrate any sensors or detection systems that are part of the machine (e.g., laser guides, material sensors).
- Ensure these systems are functioning correctly to maintain cutting accuracy.
- Material Feed Calibration:
- If the machine has a conveyor or automated feed system, calibrate it to ensure smooth and consistent material movement.
- Adjust the feed rate and tension to prevent material slipping or misalignment.
- Safety Checks:
- Verify that all safety mechanisms, such as emergency stop buttons and guards, are functioning properly.
- Conduct a safety check to ensure the leather cutting machine stops immediately if any safety device is triggered.
- Final Testing:
- Run a final series of test cuts using the actual leather materials intended for production.
- Inspect the cuts for precision, consistency, and quality.
- Make any final adjustments based on the test results.
Documentation and Training
- User Manual and Training:
- Thoroughly read the user manual and setup guides provided by the manufacturer.
- Attend any training sessions offered by the manufacturer or distributor to familiarize yourself with the machine’s operation.
- Maintenance Schedule:
- Establish a regular maintenance schedule based on the manufacturer’s recommendations.
- Keep a log of maintenance activities and any calibration adjustments.
By carefully following these initial setup and calibration steps, you can ensure that your leather cutting machine operates efficiently and accurately, reducing downtime and enhancing productivity.